Your Drill Bit Cheat Sheet: Materials Made Simple
By Diego Castillo • 3rd Oct
Choosing the right drill bit set and mastering how to match bits to materials transforms frustrating DIY moments into clean, confident holes. As a weekend drilling instructor, I see beginners waste time (and bits!) guessing at materials. Forget complex charts. This cheat sheet simplifies drill bit selection into repeatable steps that grow with your skills. Start simple, lock the ecosystem, and let skills compound.
Why Material Matching Matters More Than You Think
Mismatched bits cause walking, overheating, and blowouts, especially for new builders. When your first kit aligns with common household materials (like pine shelves or electrical boxes), confidence compounds fast. Remember my Saturday class student who swapped to a shorter High-Speed Steel bit? One mid-speed clutch click later, they sank their first straight pilot hole. Momentum matters. Confidence comes from repeatable wins, not expensive kits.
1. The Big Three: Drill Bit Materials Decoded
Before we talk coatings, understand these core materials. I define terms upfront because confusing "HSS" with "carbide" wastes bits (and patience).
-
High-Speed Steel (HSS): Your starter superhero. Affordable, sharpenable, and tough enough for wood, plastic, and soft metals like aluminum. Best for: Weekend shelves, furniture builds, or electrical boxes. Avoid with: Stainless steel or cast iron. Tip: Look for a 135° split point tip (like the DEWALT Black & Gold set) to reduce walking on smooth surfaces.
-
Cobalt (HSCO): The upgrade for stubborn metals. Handles stainless steel and cast iron without overheating. Best for: Appliance repairs or metal railings. Trade-off: Costs 2-3x more than HSS and can't be sharpened at home. Beginner note: Skip cobalt until you consistently drill through 18-gauge steel (most homeowners rarely need it).
-
Carbide (Carb): Masonry and tile specialist. Shatters glass/ceramic less than standard bits. Best for: Tile backsplashes or concrete anchors. Critical safety reminder: Always use carbide bits at low speed (under 500 RPM) to help prevent shattering. Never use for wood, as fragile tips snap under lateral pressure.
2. Coatings: The Unsung Heroes
Coatings extend bit life, but aren't magic. Here is what actually helps beginners:
-
Black Oxide: Rust-resistant HSS for damp garages. Perfect for outdoor decks (cedar, redwood) and PVC piping. Adds 20% lifespan versus bare HSS. Wood drilling tip: Pair with pilot holes in hardwoods to prevent splintering.
-
Titanium Nitride (TiN): Gold-coated bits reduce friction on metals. Metal drilling techniques: Use on aluminum HVAC ducts or bike frames (but skip if drilling cast iron; heat buildup dulls coating fast). Reality check: Titanium bits can't be sharpened, so buy them as part of a drill bit set with standard HSS backups.
-
Bright Finish: Bare metal bits for plastics and softwoods. Skip if: You work in humid climates (rust risk). Pro move: Keep one handy for plexiglass (coated bits can melt plastic).
3. Your Material Cheat Sheet (5-Minute Decision Flow)
Bookmark this for your next project. Test materials before you drill:
| Material | Bit Type | Speed Setting | Safety Check |
|---|---|---|---|
| Softwood | HSS, Black Ox | High (1,500+) | Clamp workpiece; use backing board |
| Hardwood | HSS, Sharp Tip | Medium (800) | Pilot hole 70% bit diameter |
| Aluminum | TiN-Coated HSS | Medium (1,000) | Lubricate with cutting oil |
| Stainless Steel | Cobalt | Low (400) | Never stop while drilling |
| Tile/Concrete | Carbide | Very Low (300) | Use hammer drill mode only |
Time estimate: This table cuts material-matching time from 20 minutes to 90 seconds. I've seen students avoid cracked tiles by checking it mid-project.
4. Starter Kit Strategy: Less is More
New builders overbuy. My classroom rule: Start simple, lock the ecosystem, and let skills compound. A 14-piece HSS drill bit set (like DEWALT's DWA1184) covers 90% of beginner tasks:
- 1/16" to 1/4" sizes for pilot holes and light metal
- 3-flat shank prevents chuck slippage
- Split-point tips for clean starts
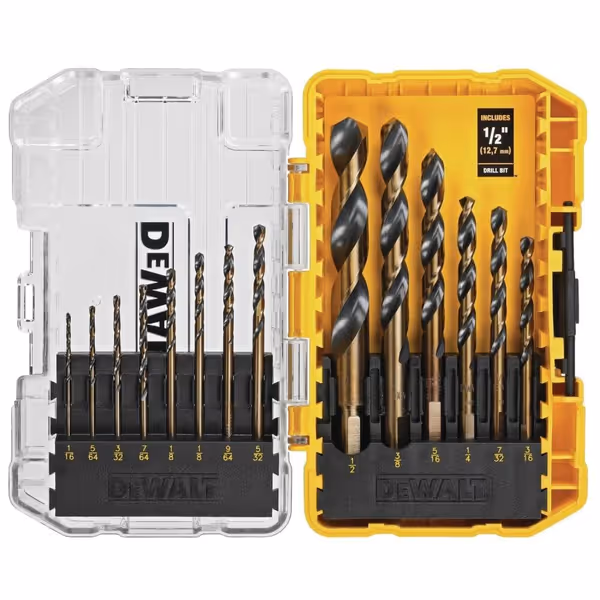
DEWALT 14-Piece Drill Bit Set
Effortless drilling in wood, metal, plastic with lasting precision.
$12.99
Tip Design135 Degree Split Point (reduces walking)
Tip Design135 Degree Split Point (reduces walking)
Pros
Reduces bit walking and improves accuracy on start.
Durable High-Speed Steel for multiple materials.
3-Flats shank prevents slippage in chuck.
Cons
May require larger sizes for heavy-duty applications beyond household.
Customers find this drill bit set to be well-made and an excellent value, with bits that cut through hard steel with ease and maintain sharpness over time. The size range is perfect for household and DIY projects, and customers appreciate its utility as a toolbox addition. The bits are durable, with smaller ones holding up well during drilling, and one customer notes they work nicely for various applications.
Customers find this drill bit set to be well-made and an excellent value, with bits that cut through hard steel with ease and maintain sharpness over time. The size range is perfect for household and DIY projects, and customers appreciate its utility as a toolbox addition. The bits are durable, with smaller ones holding up well during drilling, and one customer notes they work nicely for various applications.
Skip masonry or cobalt sets until you've drilled 50+ holes. Why? First, master speed control. Second, your ecosystem (batteries, chuck) matters more than bit variety. In my makerspace, students who start with 3 gimmicky kits quit 3x faster than those with one focused drill bit set.
5. Safety First: The Silent Saboteurs
Three beginner traps that ruin bits (and projects):
-
Speed creep: Cranking RPM too high melts plastic or glazes metal. Fix: Start at the lowest clutch setting; increase only if the bit bites cleanly.
-
Dull bit denial: Using a nicked bit strains your drill motor. Check: Tap the bit tip lightly on glass, if it rings (not clicks), it's still sharp.
-
Wet material mistakes: Drilling pressure-treated wood? Use HSS bits only. Coatings react with chemicals, creating toxic dust. Always wear an N95 mask.
Actionable Next Step: Build Your Confidence Ladder
Confidence comes from repeatable wins, not perfect tools. Today: Grab your drill and this 3-step test:
- Identify your next project's primary material (e.g., "pine shelving").
- Match to Section 3's table, no guessing.
- Drill one hole at the recommended speed into scrap wood.
Do this before buying another bit. That single hole builds more confidence than any 50-piece kit. When you're ready to expand, revisit our battery ecosystem guide, where I'll show how to add impact drivers without duplicating chargers. Until then: Start simple, lock your process, and let momentum do the rest.
Related Articles